Player is Null: Creating Versatile Code
For over a year, I have been a Gameplay Programmer for Drillbit Studios, which was founded within Indiana University’s game design program. The project had started about a year before I joined the team, as I was working on another project at that time. The process of being integrated into a new team and project is a weird combination of eagerness, curiosity, and a little bit of suspense, especially knowing that you're going to be working with new people and their vision of what this game will become for a long period of time.
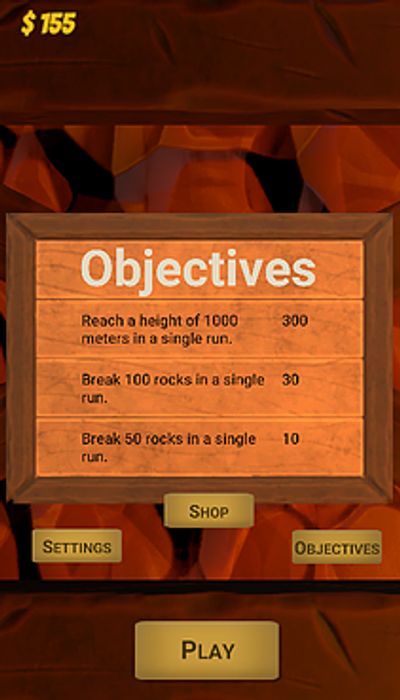
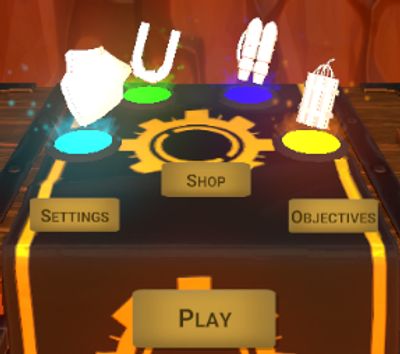
The game we developed has just been released to both mobile platforms, which is titled THIS IS NOT A DRILL. The game has the player take control of a dwarf with a large drill for an arm, where his goal is to climb up a mineshaft by drilling through falling blocks as lava rises beneath him. The two main aspects that I worked on was the objective systems, which had the player perform certain tasks for a coin reward, and the upgrade system, which lets the player spend coins to upgrade the various powerups in the game.
It’s needless to say that both these systems revolve around the Player object (we will just refer to it as the Eustace for now on, since that’s the dwarf’s name in this prodigiously lore-filled game). The objectives need to see what the Eustace has accomplished while the upgrades are comparable to skill points. It’s also safe to assume that these systems must always be present in the game. The problem lies in assuming that the Eustace will always exist within the game, and making it so that both systems will break if the Eustace doesn’t exist. Well, that’s exactly what I did.
.png/:/cr=t:0%25,l:0%25,w:100%25,h:100%25/rs=w:400,cg:true)
Condensing the Game
At first it seemed that always needing a player reference was okay to do, but it doesn’t take much for stable-looking scripts to break upon the slightest of changes. In this instance, all we did was move the main menu to the same scene as the game level, which contained the scripts for upgrades and objectives. To put it simply, we wanted the game to seamlessly transition from the menu into the gameplay. So, when the menu is active, you can probably guess what isn’t. Yep, that’ll be Eustace.
As soon as we moved everything, we were bombarded with errors, most of them pointing at two scripts; Objectives and upgrades, with the predominant message being “Player is null”
The Quick Fix
The best thing one can do to prevent this from happening is making things that can be optional, optional. The next best thing is to make something that isn’t optional throw a custom error message if the reference is null. It’ll save a lot of time debugging. The objective system was the easy fix. Since the logic that tracked the player’s objective progress was within the same function, all it needed was a “if” statement checking if Eustace was referenced. If not, then the code doesn’t run. Things weren’t as simple for the upgrade system.
Making Systems Work, Null or Not
The upgrade system used to have to be able to communicate with the player and the Gamecontroller script simultaneously. The Gamecontroller holds the logic of saving the levels up each upgrade. When purchasing the upgrade, it would call a function in the Gamecontroller to upgrade a single level, then get the new level and send that level to the player. Essentially, most of the logic was put into the update function, which is called every tick.
I learned that this was not only going to break if the player doesn’t exist, but it’s overly complicated and resource-demanding than it needs to be, especially with almost everything being in the update function. So, I scrapped most of the code and rewrote it to be more “linear”. Now, upon upgrading, it calls to a method within the Gamecontroller, which increases the level by one, and when Eustace is enabled, his script retrieves the levels from the Gamecontroller.
Closing Statement
In conclusion, three things can be learned from this experience. First, don’t put everything in the update function, and have methods run only when necessary. Secondly, make references optional when they can. If not, create a custom error message if the reference is null. Lastly plan out how classes, scripts, methods, etc. will communicate between each other before implementation. It’s easy to get lost.
Thank you for taking the time to read this blog. I hope you enjoyed reading about one of the many experiences there are in creating a game. If you have any questions, feel free to check out my contact information.
Tips for creating your game

Playtest early, playtest often
I have playtesting as the first tip on this list for a reason. Video games are highly dynamic experiences, the interactions and the flow of the game are ever changing from one moment to the next. Every playtest will give you more data, point out flaws or pain points for the players, help discover which features don’t work, which to focus on, and which to cut.
When we first started out development, we didn’t do any playtesting for almost the first four months. This kept us from developing and correcting game breaking issues and design flaws that took longer to recover from as we were far into the development cycle and had a harder time making foundational changes.
Luckily, we learned from our early failures and one of our team members stepped up and took control of our playtesting sessions. From then on out, we ran playtesting sessions with volunteers two or three times a week for the proceeding 18 months. From the feedback, we were able to find and fix game breaking bugs, iterate and design a working controller, and get direct feedback on new features. It is not a stretch to say that if we hadn’t play tested, we would not have had a game.
Find the fun early
Games need to be games first. If they are not enjoyable, why would you want to play? This is important not just for your audience, but also to yourself as the developer as well. There is nothing worse than not enjoying the game that you are creating when you will be working on it for possible 24 straight months. This can lead to fatigue and burnout, which leads to less motivation and productivity.
When we first started development, one of our team members was not thrilled to be working on the project. While they were able to complete all their tasks on time, there was no fire behind the work. After a few months, it just clicked for them. From then on out, they were the hardest working member of our team. Between innovation, prototyping, and implementation, they were able to push out huge amount of polished content in short order. Once they found their passion for the game, we made huge strides towards publishing.
Often times the keys to success as a game developer is to create a game that you love playing yourself. If you're longing to finish the game so you can get your hands on it and start playing, that's a good sign.
Cut early, Cut often
Every development starts with lofty goals. ‘We want to create an FPS MMO in a completely modeled and detailed New York City where everyone in the world can play at once and be able to purchase their real-world groceries at the virtual super market.’ Bloated features such as this example are great ideas and thoughts about a possible ideal game, but become unrealistic once you factor in time until release, budget, and team capability. Bigger does not mean better.
The Untitled Goose Game released at the end of 2019 on multiple platforms and was created by four developers. It went on to top the Nintendo Switch charts beating out The Legend of Zelda: Link’s Awakening, published by Nintendo and created by dozens and dozens of developers. Bigger does not mean better.
We went through the cutting of features multiple times over the months of the game, even some features all the way up until release and beyond. Cutting these bloated features allowed us to keep our scope under control, and actually lead to us having time to add back in some of our favorite cut features towards the end of our production cycle.
Polish!
Polish is what takes an idea or a prototype to the next level and makes it a game. One of the best ways to add polish that is usually overlooked is through the audio. In real life, everything makes noise. Your game should be the same. For the first six months of development or so, we had certain sounds. Blocks breaking, jump noises, and some ambient music. Cool, we had sound, but our game felt empty.
Over the next year, our sound designer went through the process of adding dynamic sounds to almost every aspect of the game. UI click sounds, cycling through multiple block breaking sounds, voice acting for the character jumping, falling and death, the lava gurgling, background ambient noises, mine carts swooshing, upgrade spawn sounds that enact a Pavlovian response, and a dozen other effects.
The effort of our sound designer took our game from just having sound to a whole new level. Our world was alive. You can close your eyes and be immersed in our world. Audio polish in games is often far too overlooked. Before you publish, make sure your world is alive.
Building for iOS
Something that I quickly discovered when trying to release to the Apple App Store, is that there is little documentation out there about all the struggles that you will face. It seemed like I had to visit dozens of sites during this process, all getting me a little closer to releasing. In this blog, I intend to write out my process so that maybe you can release a little quicker than I did.
My first recommendation would be to find a Mac or MacBook that you own or which you have an administrator profile on. You will need to download a few programs and give permissions to others; it will also be incredibly helpful to have usernames and passwords saved to your keychain.
Software Needed
First, you will need to get Unity onto your Mac. I would get Unity Hub and then try to install the proper Unity version through there. Sometimes, certain Unity versions will not download properly onto Macs, if this happens (as it did for me) any later update of that same version should be fine (ex. 2018.3.0 -> 2018.3.14 should be fine).
If you have been using FMOD in you project, you will need to download it onto your computer as well. It is important here that you download the same version that you’ve been using to create the project (for us it was FMOD 1.10.10) as this will cause issues later if they are not the same. You want to download the proper Unity/FMOD integration with the download as well, this is crucial for use in Unity.
You will also need Xcode, I would use the most recent version as it causes less issues. If you are unable to update to the most recent version, you might be able to change the target version when building in Unity.
Before Building
Right off the bat, if you have been using Unity Recorder, you need to delete the entire folder. If you do not, you will get a fatal error about 5 hours into this process when you finally are submitting to Apple.
You will also almost definitely need to rebuild in FMOD on this machine before you make a build. To do this, follow this exact order:
- Navigate in Finder to where your FMOD project is and delete the entire build folder.
- Go into your Unity project’s asset folder and delete your entire streaming assets folder.
- Go into FMOD and rebuild your project.
- If you do not have a mobile-specific build yet, consider going to FMOD -> Preferences -> Builds then right click under platforms and add a mobile build. Now when you build you will have a folder for each platform
- Go into Unity and click on FMOD -> FMOD Settings. Here you can locate your master project file, select a specific build folder (which you just created) or choose the entire build folder which contains multiple platform build fodders under it.
- If the streaming assets folder has not been rebuilt with two files in it, you may need to go to FMOD -> refresh banks
Now with your sound integrated properly into Unity, you need to fix some settings within Unity.
Because some settings require you to be in an iOS build, start with going to File -> Build Settings then click on iOS and change platform. After that long process, you should be switched to an iOS project.
Go to Edit -> Project Settings -> Quality and set the default (green check mark) to ultra (or whatever setting you want to build as).
Also, go to the player tab to properly setup the metadata. Make sure the company and product names are correct (product name is how it will appear on the phone). Also make sure you have a proper version number; you cannot have more than 3 consecutive numbers between dots (.) so you cannot use a full 4-digit year as your version number (we changed ours to 1.0 and 1.1). Now scroll down to Other Settings -> Identification and set your Bundle Identifier to what you have (hopefully) already setup with proper permissions and settings on App Store Connect. Also make sure to properly set your build number (this is only visible to you and will help you identify which build is which once uploaded to App Store Connect). We started our build number at 0 and added one for each new build.
If you are using FMOD you will also need to make sure you are building for a compatible iOS version. Scroll a little further to Configuration and change the Target Minimum iOS Version to 11.0 (for now). This should ensure the sounds work properly when built.
Now with all that out of the way, you should be ready to build. Go to File -> Build Settings and build the project. I would set the location of the build to be somewhere easy to find and away from your Unity project, perhaps your desktop. Once the build is complete, locate the folder, and click on the Xcode file inside.
Xcode Pre-Build
In Xcode, make sure that you are signed into your company’s profile (Xcode -> Preferences). You need to make sure your profile has proper signing permissions in App Store Connect as well.
Now on the main screen, make sure that on the left your have the folder icon selected and then select your project under Targets. Ensure that the information here is accurate including the app display name, the bundle identifier (will auto update if you change the display name which you probably do not want), the version, and the build number.
Go to Signing & Capabilities, select your profile, and turn on Auto Signing (requires password) which should then go through with no errors (if it does you need to make sure you have the proper permissions and profile selected).
Now go to Build Settings on both the target and the project objects (on the left of the editor area) and make sure that the target version is 11.0 (for FMOD).
Now look for the magnifying glass icon on the left navigator area, click it, and search for “UIApplicationExitsOnSuspend” it should find and highlight a Boolean setting in the project. This setting is deprecated and will cause a fatal error in your final steps if it is left in the project. To fix this, just find the setting and delete it (hover over and select the “-” button).
Finally, we will fix some deprecated settings. You can start the build in the top left with the play button, only keep it running for about 3 seconds before stopping the build (just long enough to see about 6 warnings in the left editor). These warnings are mostly about language localization settings. You can click each of the system warnings (not project warnings) and Xcode will ask you if you want to update those settings (you do).
With all of that done, go ahead and build the project. If you want to test the build on an iPhone after it is done (you do) then go ahead and plug in your iPhone at this point.
Xcode Post-Build
Once the build is complete, go ahead and test it on your phone. If it is not functioning how you want, you may have to go back to Unity, make your changes, then repeat all of the steps above (I did this about 35 times over the course of 3 days).
If your build is the one you want to submit, it is now time to upload it to App Store Connect. There are many ways to achieve this, but I will tell you the simplest way I have found. In the top bar, select Project -> Archive Project and Xcode will rebuild the entire project but into the archive. After this is complete you should be able to find the project in the Archives (you can find this by going to Window -> Organizer -> Archives).
Finally, select the build you want to upload and select Distribute App. Next there will be a series of questions and settings that you will have to decide on; it is probably best that you just keep them all selected and select upload to App Store Connect. You will also be asked about signing, I would just select auto signing. If you have done everything properly up to this point, the build should upload completely without an error.
You build is now uploaded! Give it about 20 minutes and you will be able to find it in App Store Connect under your project and version number.
I hope that this blog helped you and saved you many frustrating hours of trial and error and searching online.

My Experience Publishing a Game

Introduction
I remember the night very vividly when I decided that I was going to pitch a game to my University’s Game Design Program. It was very early in the semester and students were encouraged to pitch games to the class where only a select few games get picked to move forward. It was probably 3AM and I had trouble sleeping and suddenly a thought came to me, “Why not just try?” And that split-second decision would later lead to a published mobile video game titled THIS IS NOT A DRILL, available on Google Play and iOS. The semester before I was taking a class called Production I, and in this class,we were learning the basics of game development in Unity and coding in C#. At the end of this class, we had to make a final project where we designed our first game without the help of a tutorial. At first, I remember this being incredibly daunting because I had no clue what I wanted to do, so I started to look at some other games for inspiration. And that is when it hit me, I wanted to make a game kind of like this flash game I loved in middle school called Avalanche. In this game, you control a white rectangle, whom my friend dubbed “the stick of gum”, and you would platform your way up falling blocks while escaping the imminent threat of rising
lava. I always thought this game was fun, but it was lacking any kind of systemic depth and had some incredibly unrewarding gameplay features. There were moments where you could get trapped underneath the rising tower of blocks and you would not be able to climb your way out, so you would just have to accept death and hope to not have bad luck next time. And that is all there really was to
this game, but for some reason it still stuck out to me and I thought it was cool. It was then that I said to myself, “I think I could make this game...but better” so I set my mind to making this my final project for Production I.
Lavalanche
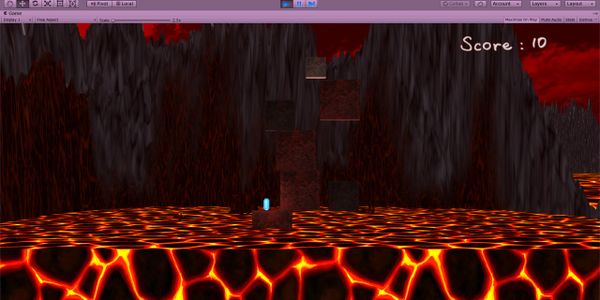
It started off with coding the player movement. In Avalanche, you could only move side to side and jump. However, you could sort of stick to the sides of falling blocks and then wall jump from them. With the help of my professor I was able to get the player movement working in the most basic way. My wall jumping’s physics were a lot worse than Avalanche, but it still worked. After the player movement I needed the raining blocks to spawn in from the sky. This was as simple as creating a range on the X axis that was capable of instantiating block prefabs. Originally, I had them spawning in on screen because I didn’t know how to get it to make it happen off screen; I later found out that you could just spawn in the blocks above the player’s Y position at a distance high enough so that the instantiating didn’t appear on screen. All that was truly left after this was creating the rising lava. To do this, I just made a giant cube and gave it lava texture and gave it a Box Collider and marked it as a trigger. When this trigger collided with the player, it would check the tag to make sure it was colliding with “Player” and if it was, the player would be destroyed and the game over menu would pop up. I then just free-balled some 3D terrain in the background and added a height score and this final project was
basically complete. I titled this game “Lavalanche” and this is what the game ended up looking like:
Evalanche
Fast forward to the next semester and I continued to work on this game a little bit more for another class called Sound for Games. I used this existing project to implement sound using FMOD. I basically duplicated this lava level and made another level that was pure ice. All that happened in this part of the project was that I demonstrated that I could compose music that would adhere to a specific aesthetic and also add in sound effects for basic interactions like button clicks and player death. Lavalanche then evolved into Evalanche, and this was the game that I chose to pitch to my Production II class.
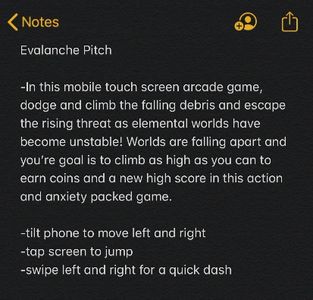
The night I decided to pitch I began writing a bunch of notes in my phone so I didn’t forget the things that were on my mind. Here is a screenshot of exactly what I wrote and what I imagined this game to be at the time. Originally, I wanted this game to be a mobile tilt-controlled game. I thought doodle jump was very fun and my game was somewhat like this, so I thought tilt controls would be a cool way to play. It wasn’t until later that my professors and other students thought that tilt controls was a terrible idea for this game. At first I was really hurt and hard headed about wanting tilt controls as the main way to play because I thought it would work perfectly fine, but I soon figured out myself that they were right and tilt was not the best way to play. This was mainly because in this game you have to be really precise with your movements and keeping completely still was almost impossible with tilt. I wanted multiple differently styled levels with a progression similar to Rodeo Stampede. In this game, you complete a myriad of challenges and collect enough coins to buy a new level. These new levels introduce new standard animals and a new environment to traverse. I wanted to mimic this with having different objects fall from the sky but have them agree with what level you are in. For instance, falling icicles in the ice world, toxic waste buckets in an industrial acid level, or a lava block that burns you when you stand on it. It’s cool to see that this idea ended up staying with our game in the long run. To make this long introduction short, I then gained the confidence to try and pitch my game to my peers and professors. It was tough for me because I am not the best public speaker and I hardly knew anyone in the class, so I was incredibly nervous to put myself up there and try, but I did. I ended up making it through the first pass and we moved on to the next phase in development which I like to call “The Shark Tank Era.”
After my game went through the first pass, I gained two more team members to have a group of three that would begin taking my prototype and improving on it to make it through the second phase of weeding out. In this phase, all the games that made it through the first round would then participate in the Shark Tank Pitch where each team would create a presentation and pitch to three industry professionals in the commons of Indiana University’s Media School. In this phase we made some of the biggest changes and updates to our game that stuck through to the present. Evalanche soon became temporarily named “Grouplanche” mainly because I was not the only developer anymore and I had a team. Pretty lazy name, I know.
Grouplanche
Our team was comprised of me, Bradley, and Jesse. Bradley was a sound designer like me, and in the beginning, he mainly helped with designing new mechanics and gameplay features. Jesse is a gameplay programmer and was able to add in all the new, cool ideas into our game. The first of these new additions were new blocks that had different interactions than the basic blocks that fell. This included the spike block, slime block, and trampoline. The spike blocks had spikes on the side that would kill you if you touched them. The slime block did not have a fixed rotation and would bounce around and slide between other blocks and the trampoline would just let you jump higher if you jumped from it. However, it was soon after this that the biggest change from Avalanche came about: the ability to destroy blocks that you jumped and hit from underneath. This works a lot like how is it's in Mario games when you jump into blocks to destroy them. This made it so that players could no longer just get unlucky and die because they got put in a bad spot;now you could simply destroy blocks above you so you could always find a way up. However, you didn’t want to destroy them all because the threat of the lava was still imminent. The player is pitted with choosing what to destroy and what to utilize to get higher up. Soon after this, we implemented a few power-ups that you could use to help you in game. The first two were the Jetpack (who doesn’t love a good jetpack) and a shield. The jetpack would just propel you up higher as you would expect, and the shield would prevent lethal damage that would otherwise kill the player. Everything was beginning to come together, and our game was becoming more and more game like as time went on.
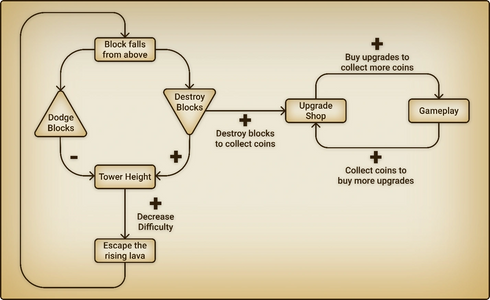
One of the other teams in my class was disbanded so there were now some free agents in the class looking to work on the other projects. It was then that Nick wanted to join our team and help with the development of our game. He was a programmer and a designer much like Jesse. I remember distinctly meeting as a team soon after where we would discuss the overall theme of our game and how we wanted to stylize our gameplay experience. It was then that we came up with the idea to make our game take place in a collapsing mine shaft and our main character would be an old prospector who dug a little bit too far and hit lava. Nick then came up with the idea that I think changed our game forever. He said, “What if when you destroy the blocks, coins spawn out of them?” I don’t think anyone really realized at the time how huge this change was and how much it truly turned our experience into an actual game. This then created an amazing gameplay loop that I think defines our game’s core experience.
On the left is our game’s core loop and on the right is our progression loop. Adding in coins to spawn from destroyed blocks connected these two loops and soon became the defining gameplay experience for our game. We soon made the power-ups upgradable and this was basically where our game was right before our shark tank presentation. We created and rehearsed a presentation and just did our thing. The judges saw promise in our game, and we ended up moving forward and gained confirmation that our game was soon going to be published by the end of our college experience.
THIS IS NOT A DRILL
We started off this new phase by making a completely new Unity project and migrating everything over and cutting off some of the bad coding that was still lingering from the early prototype I created. Jordan began the creation of the mineshaft, our main character Eustace Diggs, and all the other blocks that were in the game earlier. However, it was around this time that I began having a lot of issues working with FMOD. For some reason, the sounds would not work for any of my teammates that did not have FMOD installed. For their game to work, they had to install FMOD and build the game every time to play it for Unity to not be completely busted. We soon found out that during our migration that the FMOD build data was somehow added to our repository’s .gitignore. After we fixed this, FMOD became a little bit more manageable, but we still ran into issues with FMOD all the time. I could talk about all the changes my team made from this point onward, but instead I will now focus on just my work with the game moving forward.
It was soon that Grouplanche became THIS IS NOT A DRILL after a long brainstorming session with my team. For the game’s soundscape, I was faced with simulating what an actual mine shaft would sound like. I did a little research on how sound works in a close-quarters area like a rectangular mine shaft and came to the conclusion that I was going to have reverb on almost every sound effect that takes place in the game world. This is because sound bounces off everything and creates smaller, quieter sounds called partials. To make it sound like a mine shaft, I needed the everything to sound like it was bouncing off all the walls. I used the FMOD reverb tool to give most all sound effects a consistent reverb so that I could maintain continuity between everything. I also have some background ambience to help set the mood that this mine shaft is collapsing. These sounds all have a heavy low-pass filter on them to make them feel like they are in the distance as opposed to right in your face. I also did not want these sounds to take priority over gameplay, so I made sure they were mixed lower than the most important sounds. These ambient noises include big blasts, cracking rocks, falling broken pipelines, and echoing booms. You can hear these noises at all points in the game as they are scatter events attached to the main camera. This was a design choice I wanted to make because I wanted to get across to players that you are not in a safe environment. If you stay idle on the main menu you can hear these sounds play randomly and this lets you know that shit is going to hit the fan when the game starts and this is no ordinary mine shaft. I think these sounds helped create a dangerous atmosphere that my team wanted to express in our game.
All the power-ups, except the TNT, have looping sound effects. In order to get sounds to loop seamlessly, I used Adobe Audition and put the audio clip on a multitrack mixdown. The trick is to cut the audio in half and set the second half to start the sound and then crossfade the end with the beginning of the other half. Since the end of the first half is now at the end of the clip, it will seamlessly loop into the itself. I used this method to make sure there weren’t any hiccups in the audio for each power-up. In FMOD you can then set loop regions above the sound clip and it will continuously loop until you tell it to stop in the code. Of all the sound effects I made for the power ups, I am most proud of the ghost power-up. For this sound I used my guitar with a slide and gave it a lot of reverb. I moved my slide back and forth between two adjacent frets. This sound creates a harmonic dissonance and sounds like a ghostly wail. I think this sound is very cool to me because I already knew in my head that it was going to work before I even tried just because I understood the theory behind it.
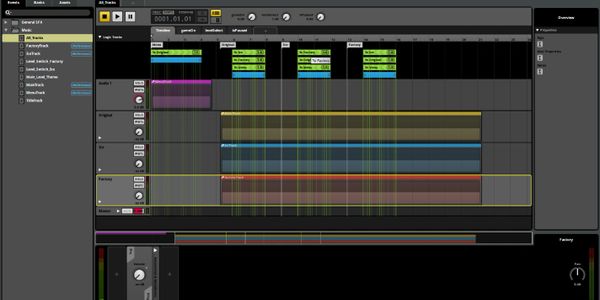
Lastly, I want to talk about how I approached our game’s music. Our game has multiple different levels: mine shaft, ice, and factory. In order to reach these alternate levels, you must make it up high enough until you see a glowing white block. When you destroy this block, the level will automatically change to one of the other two levels. Since it is such a split-second change, I needed to find out a way to get the music for the levels to transition as smooth as possible. I was able to make the music work all from one FMOD event where I referenced the other events that contained the music.
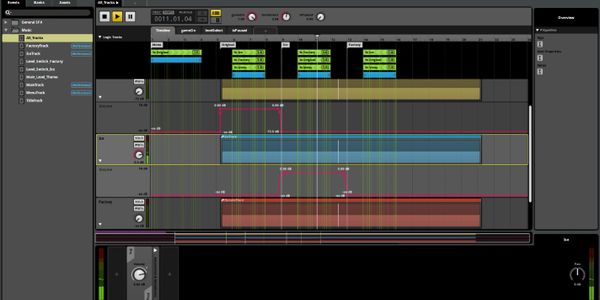
You can see here that there is MainTrack, MenuTrack, IceTrack, and Factory track. When the game starts, you are in the main menu and that is the first purple region you see. The game will infinitely loop this track until the game starts. Then, the gameOn parameter is set to 1 which transitions the menu music to the main level music. You can see in the green region there are lines that section off the area;these lines represent every 8th note in the music. This way, a transition will only fall on the next available 8th note beat of the song, and this makes it so that the transition happens as quickly as it can since this is the smallest interval FMOD will let you transition on. Once it transitions from the menu track, gameOn is set to 1 and then all of the main level themes begin to play at once. These tracks are all in the same key, time signature, and tempo so they will be perfectly in sync at all times since they were triggered all together. The difference in these tracks lies in the instrumentation. They all have the same chord progression and song structure, but each track was created to fit in the area its played in. The mine shaft is more of an acoustic approach with inspiration from Wario’s Gold Mine in Mario Kart Wii. The ice level contains inspiration from Metroid Prime’s Phendrana Drifts and Undertale’s Snowy. I really just liked the high-octave, reverbed piano keys that ice levels tend to have. The factor track was originally the main level’s track, but we felt it had a stronger percussive drive and felt more like the factory than the main level. All these tracks play simulatneously but you can only hear one at at time, and that is because the levels that you aren’t in are at in inaudible level of sound. When the levels transition, I automate the previous track completely down and the new level’s volume comes up. This way, the music always transitions smoothly and on time with the switching of levels as seen on the right.
In the end, this project ended up becoming a dream come true. I never expected my protoype to come as far as it did and I am incredibly proud of each and everyone who is on my team. We put an immense amount of passion in this game and I am happy to see all the positive feedback we have gotten post release. So far,our game has around 300 downloads and 65 five star reviews in the app store. Its not much, but to me its amazing. My advice to anyone in game design is that you have to be passionate about what you are working on, and if you believe in the idea, you can make it a reality. So, if you ever find yourself thinking, “I think I can do that” or “I know I can do that”...just do it. Believe in yourself and believe in your idea, and you will make it into a reality.
Drillbit Studios, Apple, & COVID-19
Background
A couple of my classmates and I officially made an LLC, Drillbit Studios, for our game we’ve been developing since about the middle of our 4-year college term. I am head of QA and Marketing for the team which entails me to do most of the playtests, write up docs about what we found was wrong with the game, and etc. I also run the social media of the LLC Twitter, Facebook, Instagram, and more.
The game we’ve developed together is called This Is Not A Drill, it’s a mobile endless jumper that combines the design philosophy of an endless runner with the player controls of a platformer, but with deeper movement mechanics than the standard autopilot mode. You play as Eustace an old but very abled prospector who drills down too far into the earth. You must try your best to escape the very mineshaft you’ve worked on for many years with hazards coming your way every second. I’ll incorporate a link to the Google Play Store if anyone wants to check it out.
Other than the things I’ve described earlier I’ve also been a designer for the game and make the builds for whichever platform the game is going on. This is what I want to talk to everyone about, my experience with building to mobile platforms has been very interesting and I’d like to share this with you all.
Building for mobile
To playtest the game I was tasked with figuring out how to make builds for android and use the build on my own device to get students to play. We use Unity for this game and at the time Unity didn’t let me, who’s on a MacBook, make builds through its own application. This sucked because now I had to go further and find out how I was supposed to make them then. I finally found Android Studio which lets you load your game folder into it, tweak it and supposedly create the build. This was somewhat the case, you ever feel like you’re doing what you’re supposed to do and the process just makes you go the long way around instead of being short and sweet? That’s how I felt. So it turns out making the build straight from the application wasn’t what I needed how was Unity going to connect and make it from an app it’s not associated with? It needed to happen the other way around and so I figured out what SDK needed to be there and etc and finally got it to work. Next was waiting 30 minutes at a time when it was in the building process compiling all the scenes, every object, and every shader. My god the shaders took FOREVER because there were so many obviously it’s a game. It was a process but a very long and straight forward one, since then I’ve used the same process till this day without any complaints but the day came to where I was tasked with making an IOS build for iPhones. This is where it gets interesting and when I mean interesting I mean very confusing and frustrating.
Starting out I downloaded XCode onto my MacBook which took up the rest of the space on it, this was really bad since I had classes to take care of and I had to make more builds which would take up more space but I continued on trying to get everything to work. It literally took me two days to explain to my team I had no idea how to accomplish this task after spending majority of those days on the application. With help from our professor and our sound designer we were able to get it working on a different computer and then replicate what they did on mine. This was the easy part by the way, once we were able to get the IOS build complete I needed someone’s iPhone to test it on because I don’t have one myself which was another problem because I couldn’t see if the build worked correctly unless the team was coming together for a meeting or class. I got everything ready and situated with the builds but now we had to get an apple developer account and await being approved so we can upload a build and this took forever. It turns out that we were denied a couple weeks later because there was a company with the same name in the UK so when apple figured that out it took even more time I mean so much time that we did the set up in the middle of February they told us in March and we just got approved in April. Remember when I said most of the space was taken up on my computer? It became such a problem I had to uninstall XCode which then meant we had to use the Mac lab in our building to use it on. This also means that COVID-19 progressed so far that the government shut down our university and now we’re not able to build unless I get more space on my computer which isn’t an option with the lack of funds I have due to the virus as well. Moral of the story is if you’re a new mobile developer who wants their game on the apple app store make sure you sign up and create everything way beforehand because they can take a long time to process your company and make sure you have another way to create builds as a plan B so you don’t end up like my company dealing with the worst scenario possible.